
How to Install Windows 10 from a USB Drive: Your Ultimate, Step-by-Step Guide
Are you looking to perform a fresh Windows 10 install, upgrade an older operating system, or troubleshoot persistent software issues? Learning how to install Windows 10 from a USB drive is an indispensable skill for any PC user. This comprehensive guide will walk you through every critical step, transforming a potentially daunting task into a straightforward process. By leveraging a bootable USB drive, you gain unparalleled flexibility, speed, and reliability compared to traditional DVD installations. Prepare to unlock a seamless, optimized Windows 10 experience on your computer.
Why Choose a USB Drive for Windows 10 Installation?
In the modern computing landscape, optical drives are increasingly rare. Installing Windows 10 from a USB flash drive offers distinct advantages that make it the preferred method for many users and IT professionals alike.
Speed and Portability
- Faster Installation: USB 3.0 and newer drives offer significantly faster data transfer speeds than DVDs, drastically cutting down installation times. This means you’ll be up and running with your new operating system much quicker.
- Ultimate Portability: A small USB drive is incredibly easy to carry, allowing you to install Windows 10 on multiple machines without needing a bulky optical disc or external drive. It’s the perfect solution for technicians or those with several PCs.
- Future-Proof: As more laptops and desktops omit optical drives, a USB-based installation becomes not just convenient, but often the only viable option for a clean install Windows 10.
Advantages of a Clean Installation
Performing a clean install of Windows 10 from a USB installation media offers numerous benefits over an in-place upgrade:
- Performance Boost: A fresh installation eliminates old registry entries, leftover files, and potential malware, resulting in a snappier, more responsive system. This is crucial for maintaining peak PC performance.
- Troubleshooting Resolution: Many software-related issues, system slowdowns, and persistent errors can be resolved by wiping the drive and starting anew.
- Optimal Resource Utilization: Without accumulated digital clutter, your system resources (RAM, CPU, storage) are freed up, ensuring Windows 10 runs as efficiently as possible.
Essential Prerequisites Before You Begin
Before you embark on the journey of installing Windows 10, a few crucial preparations are necessary. Skipping these steps can lead to data loss or installation failures, so pay close attention.
1. Acquire the Windows 10 ISO File
The first and most critical component is the Windows 10 ISO file. This disk image contains all the necessary installation files. The safest and most reliable way to obtain it is directly from Microsoft.
- Microsoft's Media Creation Tool: This is the recommended method. It allows you to download the latest version of Windows 10 and directly create a bootable USB drive simultaneously. You can download it from the official Microsoft website. Simply search for "Windows 10 download" and look for the "Download tool now" option.
- Direct ISO Download: For some users, Microsoft also provides direct ISO downloads. Ensure you select the correct edition (Home, Pro) and architecture (32-bit or 64-bit) for your needs.
2. Prepare Your USB Flash Drive
- Minimum 8GB Capacity: Ensure your USB drive has at least 8GB of free space. For Windows 10, 16GB is often recommended to be safe, especially if you plan to include multiple versions or architectures.
- Empty Drive: The process of creating a Windows 10 installation media will format the USB drive, erasing all its contents. Backup any important data from the USB drive to another location before proceeding.
- USB 3.0 (Recommended): While not strictly necessary, using a USB 3.0 drive in a USB 3.0 port will significantly speed up the creation of the bootable drive and the installation process itself.
3. Secure Your Windows 10 Product Key (Optional but Recommended)
While you can install Windows 10 without a product key and activate it later, having your product key activation ready streamlines the process. If you're reinstalling Windows 10 on a machine that previously had an activated digital license, you might not need to enter a key at all, as it will activate automatically once connected to the internet.
4. Back Up Your Important Data (CRITICAL!)
This cannot be stressed enough. A clean install will erase everything on the drive where Windows 10 is being installed. Before you start, copy all important documents, photos, videos, music, and other files to an external hard drive, cloud storage (like OneDrive, Google Drive, Dropbox), or another computer. This is the single most important preventative measure against data loss.
For more advanced users, consider creating a full system image backup using tools like Macrium Reflect or Acronis True Image, which can be invaluable for disaster recovery. Learn more about effective data backup strategies here.
5. Check Your System Requirements
Ensure your computer meets the minimum system requirements for Windows 10:
- Processor: 1 GHz or faster processor or SoC
- RAM: 1 GB for 32-bit or 2 GB for 64-bit
- Hard disk space: 16 GB for 32-bit OS or 32 GB for 64-bit OS
- Graphics card: DirectX 9 or later with WDDM 1.0 driver
- Display: 800x600
While these are minimums, aim for higher specifications for optimal performance, especially if you plan to run demanding applications.
Creating Your Bootable Windows 10 USB Drive
This is where your USB drive transforms into a powerful Windows 10 installation media.
Method 1: Using Microsoft's Media Creation Tool (Recommended)
This is the simplest and most reliable method for most users.
- Download the Tool: Go to the official Microsoft Windows 10 download page and click "Download tool now."
- Run the Tool: Once downloaded, run the Media Creation Tool. Accept the license terms.
- Choose Action: Select "Create installation media (USB flash drive, DVD, or ISO file) for another PC" and click "Next."
- Select Language, Edition, Architecture: The tool will usually recommend options based on your current PC. You can uncheck "Use recommended options for this PC" if you need to select different settings (e.g., 64-bit for a 32-bit machine). Click "Next."
- Choose Media: Select "USB flash drive" and click "Next."
- Select Your USB Drive: From the list, choose your prepared USB flash drive. Double-check that it's the correct drive to avoid formatting the wrong one. Click "Next."
- Download and Create: The tool will now download the Windows 10 files and create the bootable USB drive. This process can take some time depending on your internet speed and USB drive performance.
- Finish: Once complete, you'll see a "Your USB flash drive is ready" message. Click "Finish." Your USB flash drive setup is now complete.
Method 2: Using Rufus (Advanced Users)
Rufus is a popular third-party utility for creating bootable USB drives. It offers more customization options and is often used for creating bootable drives from ISOs for specific scenarios (e.g., installing Windows on older UEFI systems or systems with specific partitioning needs). If you already have the ISO file downloaded, Rufus can be a very fast alternative.
- Download Rufus: Get the latest version from the official Rufus website.
- Insert USB: Plug in your USB drive.
- Select ISO: In Rufus, select your USB drive under "Device" and click "SELECT" to choose your Windows 10 ISO file.
- Partition Scheme: Choose between "MBR" (for older BIOS systems) and "GPT" (for modern UEFI systems). If unsure, "GPT" for UEFI is generally the correct choice for newer PCs.
- Start: Click "START" to begin the process. Confirm any warnings about data erasure.
Configuring Your PC to Boot from USB
Once your bootable USB drive is ready, you need to instruct your computer to boot from it instead of its internal hard drive. This involves accessing your computer's BIOS or UEFI firmware settings.
1. Accessing BIOS/UEFI Firmware
The method to enter BIOS/UEFI varies by manufacturer. Common keys include:
- Dell: F2, F12
- HP: F10, Esc
- Lenovo: F1, F2, Fn+F2, Enter (then F1 or F2)
- Acer: F2, Del
- Asus: Del, F2
- Microsoft Surface: Press and hold the volume up button while pressing the power button.
Turn on your computer and immediately start pressing the relevant key repeatedly until the BIOS settings or UEFI firmware screen appears. If you miss it, restart and try again.
2. Adjusting Boot Order
Once inside BIOS/UEFI:
- Navigate to the "Boot," "Boot Options," or "Startup" tab.
- Look for "Boot Order," "Boot Priority," or "Boot Sequence."
- Find your USB drive (it might be listed as "USB HDD," "Removable Devices," or by its brand name).
- Move your USB drive to the top of the boot order list. Use the on-screen instructions (often F5/F6 or +/- keys) to change the order.
- Important Note for UEFI: You might need to disable "Secure Boot" or enable "Legacy Support" (CSM) if your USB drive isn't recognized, although modern bootable USBs created with the Media Creation Tool usually work with Secure Boot enabled.
3. Saving Changes and Exiting
After adjusting the boot order, save your changes and exit. Look for an option like "Save and Exit," "Exit Saving Changes," or similar (often F10). Your computer will then restart and should boot directly from the USB installation media.
The Windows 10 Installation Process: Step-by-Step Guide
With your PC now booting from the USB drive, the actual Windows 10 installation begins. Follow these steps carefully.
1. Starting the Setup
When your computer boots from the USB drive, you'll see the Windows 10 setup screen. This typically involves a Windows logo followed by the "Windows Setup" interface.
2. Language, Time, and Keyboard Settings
On the first screen, select your preferred:
- Language to install
- Time and currency format
- Keyboard or input method
Click "Next," then click "Install now."
3. Entering Your Product Key
The setup will prompt you to enter your product key. If you have one, enter it now. If you're reinstalling Windows 10 on a machine that previously had a digital license, or if you plan to activate later, click "I don't have a product key." Windows will usually activate automatically after installation once it connects to the internet.
4. Choosing Installation Type (Upgrade vs. Custom)
You'll be presented with two installation options:
- Upgrade: Install Windows and keep files, settings, and applications: This option is for upgrading an existing Windows version (e.g., Windows 7/8.1 to Windows 10) while preserving your data. It's generally not recommended for a "clean install" and is more prone to carrying over existing issues.
- Custom: Install Windows only (advanced): This is the option you want for a clean install Windows 10. It allows you to manage disk partitions and format the drive. Select this option.
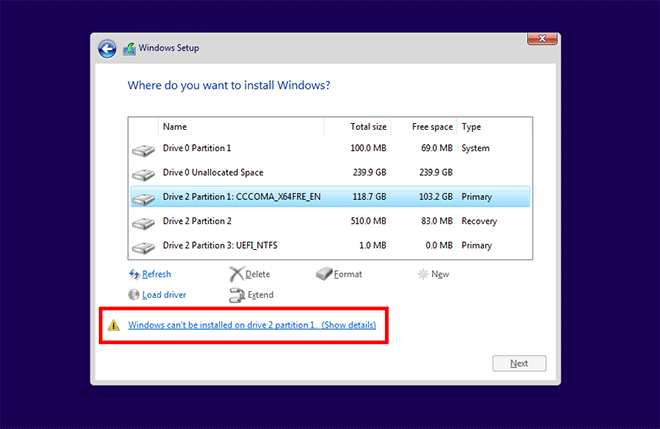
5. Partitioning Your Drive (Crucial for Clean Install)
This is arguably the most critical step for a fresh Windows 10 install. You'll see a list of drives and partitions on your computer. If you have multiple drives, ensure you select the correct one.
- Identify Target Drive: If you're installing on a new drive, it might show as "Drive 0 Unallocated Space."
- Delete Existing Partitions: For a true clean install, select each existing partition on the target drive (e.g., "Drive 0 Partition 1," "Recovery," "System Reserved") and click "Delete." Confirm any warnings. Repeat until the entire drive is "Unallocated Space." This ensures all old data and system files are removed.
- Create New Partition: Select the "Unallocated Space" and click "New." Windows will usually suggest the maximum available size. Click "Apply" to create the primary partition. Windows might also create small additional partitions for system files (e.g., Recovery, System).
- Select Primary Partition: Choose the largest partition you just created (this will be your main Windows drive, usually labeled "Primary") and click "Next."
If you wish to create multiple partitions (e.g., one for Windows and one for data), you can specify a smaller size when creating the first partition, leaving some unallocated space, and then create a second partition from the remaining space. For a detailed guide on disk partitioning, click here.
6. Copying Windows Files
After selecting your partition, Windows will begin copying files and installing features. Your computer will restart several times during this process. Do not remove the USB drive until after the first restart, or even better, until the initial setup screens appear.
7. Initial Setup and Personalization
Once the main installation is complete and the computer restarts, you'll be guided through the Out-Of-Box Experience (OOBE) setup:
- Region and Keyboard Layout: Confirm your region and keyboard layout.
- Network Connection: Connect to a Wi-Fi or Ethernet network. This is crucial for activation and updates.
- Microsoft Account vs. Offline Account: Sign in with your Microsoft account or create an offline (local) account. Using a Microsoft account syncs settings and enables cloud features.
- Privacy Settings: Review and adjust privacy settings (location, diagnostic data, etc.).
- Cortana Setup: Decide if you want to use Cortana.
Follow the on-screen prompts until you reach your new Windows 10 desktop. Congratulations, you've successfully completed the Windows 10 setup via USB!
Post-Installation Essentials: Optimizing Your New System
Installing Windows 10 is just the beginning. To ensure optimal performance and security, a few post-installation steps are vital.
1. Installing Device Drivers
While Windows 10 has a good repository of built-in device drivers, it's always best to install the latest drivers specific to your hardware (motherboard chipset, graphics card, network adapter, audio). Visit your computer manufacturer's website (for pre-built PCs) or individual component manufacturers' websites (for custom builds) and download the latest drivers. Install them one by one, restarting your PC as required.
Pro Tip: Start with chipset drivers, then graphics, then network, and finally audio and peripherals.
2. Running Windows Update
Immediately after installation and driver updates, run Windows Update. Go to Settings > Update & Security > Windows Update and click "Check for updates." This ensures your system has the latest security patches, bug fixes, and feature updates. Be prepared for multiple restarts.
3. Installing Essential Software
Now is the time to install your essential applications:
- Web browser (Chrome, Firefox, Edge)
- Antivirus software (if not relying on Windows Defender)
- Productivity suite (Microsoft Office, LibreOffice)
- Communication apps (Zoom, Discord, Slack)
- Any other software you frequently use.
4. Restoring Your Data
Finally, copy your backed-up data back to your new Windows 10 installation. Organize your files logically to maintain a clean and efficient system.
Common Troubleshooting Tips
Even with careful planning, issues can arise. Here are solutions to common problems during a USB flash drive setup of Windows 10.
1. USB Drive Not Booting
- Check Boot Order: Re-enter BIOS/UEFI and ensure the USB drive is at the top of the boot order.
- Secure Boot/Legacy Mode: Try disabling "Secure Boot" and/or enabling "Legacy Support" (CSM) in BIOS/UEFI. Some older systems or specific USB drive setups might require this.
- Recreate USB: The USB drive might be corrupted. Try recreating the bootable USB drive using the Media Creation Tool or Rufus on a different USB stick if possible.
- USB Port: Try a different USB port, especially a USB 2.0 port if you're having issues with USB 3.0.
2. Driver Issues During Installation ("A media driver your computer needs is missing")
This often occurs on newer systems with NVMe SSDs or specific RAID configurations, where Windows 10 setup doesn't have the necessary storage drivers built-in.
- Download Drivers: On another computer, download the specific storage drivers (often from your motherboard manufacturer's website) for your model and save them to another USB drive.
- Load Drivers: During the partitioning step in Windows Setup, click "Load driver" and browse to the drivers on your second USB drive.
3. Partitioning Errors ("Windows can't be installed to this disk")
- Incorrect Partition Style: If you get an error about "GPT" or "MBR" partition style, it means your BIOS/UEFI boot mode (Legacy/CSM vs. UEFI) doesn't match the drive's partition style. You might need to change the boot mode in BIOS/UEFI or reformat the drive to the correct style using DiskPart (advanced).
- Unallocated Space: Ensure you have sufficient "Unallocated Space" on the drive you intend to install Windows on. If not, delete existing partitions to create it.
Frequently Asked Questions (FAQ)
Can I install Windows 10 without a product key?
Yes, you can install Windows 10 without immediately entering a product key. During the setup, you'll see an option "I don't have a product key." Windows 10 will install but will not be activated. You can activate it later by purchasing a key or if your hardware has a digital license linked to it from a previous activated installation.
How long does a Windows 10 USB installation take?
The total time for a Windows 10 installation from a USB drive can vary significantly. Factors include your computer's specifications (CPU, RAM, SSD/HDD speed), the speed of your USB drive (USB 2.0 vs. USB 3.0), and the speed of your internet connection (for downloads during setup). Generally, the initial file copying and setup might take anywhere from 15 minutes to an hour on a modern system, with post-installation updates and driver installations adding another 1-3 hours.
What's the difference between "Upgrade" and "Custom" installation?
The "Upgrade" option attempts to install Windows 10 over your existing operating system while trying to preserve your personal files, settings, and installed applications. This is typically used for in-place upgrades (e.g., Windows 7 to Windows 10). The "Custom" option, which is what you use for a clean install, formats the drive where Windows will be installed, erasing all data and starting fresh. This leads to a cleaner, more stable system but requires you to reinstall all your applications and restore your personal files from a backup.
Do I need an internet connection during installation?
An internet connection is not strictly required for the core file copying and initial setup of Windows 10. However, it is highly recommended. An internet connection allows

0 Komentar