
How to Recover Deleted Files from Recycle Bin: Your Ultimate Guide to Data Restoration
Accidentally deleting an important file can feel like a digital disaster, sending a wave of panic through anyone. But what if we told you that recovering those seemingly lost documents, cherished photos, or critical spreadsheets is often much simpler than you think? This comprehensive guide will walk you through the essential steps and advanced strategies to recover deleted files from Recycle Bin, whether they’re still sitting there or have been emptied. Discover the secrets to successful file restoration, understand how your operating system handles deleted data, and arm yourself with the knowledge to bring your valuable information back from the brink. This article is your definitive resource for navigating the complexities of data recovery, ensuring you can retrieve your lost files with confidence and expertise.
Understanding the Recycle Bin: Your First Line of Defense Against Data Loss
The Windows Recycle Bin is more than just a trash can; it's a critical safety net designed to prevent immediate data loss. When you delete a file by pressing the 'Delete' key or right-clicking and selecting 'Delete', the file isn't instantly wiped from your hard drive. Instead, it's moved to a designated folder known as the Recycle Bin. Think of it as a temporary holding area where files reside before their potential permanent removal. This mechanism provides a crucial window of opportunity for users to reconsider their deletion choices and easily restore files to their original locations.
The Recycle Bin works by changing the file's entry in the file system table. Instead of deleting the actual data, the system simply marks the file's space as available for new data, and the file's path is moved to the Recycle Bin directory. This means the actual data of your file remains on the disk, making recovery possible. The size of the Recycle Bin is typically configurable, allowing you to allocate a certain percentage of your disk space to this temporary storage. Understanding this fundamental principle is the first step in successful data recovery.
Direct Recovery from the Recycle Bin: The Easiest Method
If your files are still in the Recycle Bin, consider yourself fortunate. This is the simplest and most straightforward method to recover deleted files. No special software or advanced techniques are required.
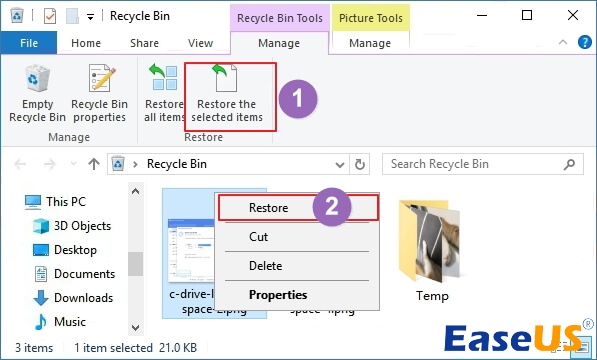
- Step 1: Open the Recycle Bin. Locate the Recycle Bin icon on your desktop and double-click it. Alternatively, you can search for "Recycle Bin" in the Windows search bar and open it from there.
- Step 2: Locate Your Files. Once open, you'll see a list of all files and folders that have been deleted. You can sort them by name, original location, date deleted, or size to help you find what you're looking for. Use the search bar in the top-right corner if you remember the file name or type (e.g., ".jpg", ".docx").
- Step 3: Select and Restore. Right-click on the file or folder you wish to recover. A context menu will appear. Select the "Restore" option. The file will then be moved back to its original location on your computer. If you want to restore multiple items, you can select them all (Ctrl+click or Shift+click) and then right-click and choose "Restore."
- Step 4: Verify Restoration. Navigate to the original location where the file was stored (e.g., My Documents, Desktop, a specific folder) to confirm that it has been successfully restored.
This method is highly effective because the files have not yet been overwritten or completely disassociated from their original paths. It's the most common scenario for accidental deletions and serves as a quick fix for many users.
When the Recycle Bin is Emptied: Advanced Recovery Strategies
The real challenge begins when the Recycle Bin has been emptied. Many users believe that once the Recycle Bin is cleared, their files are gone forever. This is a common misconception. While it's true that emptying the Recycle Bin removes the file's pointer from the file system table and marks the space it occupied as available, the actual raw data of the file often remains on the drive, at least for a period. This is where the concept of data overwriting becomes critical.
When you empty the Recycle Bin, the operating system simply updates its internal index, telling the computer that the space previously occupied by those files is now free and can be used for new data. Until new data is written to that exact physical location on the hard drive, the original file's data bits are still there, albeit unindexed. The immediate danger is that any new files you create, programs you install, or even system updates can write over these "deleted" sectors, making hard drive recovery impossible. This is why the first and most crucial rule for recovering files after emptying the Recycle Bin is to stop using the affected drive immediately.
Utilizing Data Recovery Software: The Most Common Solution
For most users, data recovery software is the go-to solution when files have been deleted from the Recycle Bin and are no longer directly accessible. These specialized tools are designed to scan your storage device at a deeper level, bypassing the file system index to look for lost or unreferenced file signatures (the unique patterns of data that identify file types like JPEGs, PDFs, DOCXs, etc.).
How does data recovery software work? It performs a "deep scan" of the disk, looking for these raw data fragments. When it finds a recognizable file signature, it attempts to reconstruct the file. The success rate largely depends on how much new data has been written to the drive since the deletion. The less activity on the drive, the higher the chance of a complete and successful file restoration.
When choosing data recovery software, look for features such as:
- Deep Scan Capabilities: Essential for finding files after Recycle Bin has been emptied.
- File Type Support: Ensure it supports the specific types of files you need to recover (documents, photos, videos, audio, emails, etc.).
- Partition Recovery: Useful if an entire partition was accidentally deleted or corrupted.
- Preview Functionality: Allows you to see if the file is recoverable before committing to the full recovery process.
- User-Friendly Interface: Makes the process less intimidating for non-technical users.
Several reputable software options exist, including but not limited to Disk Drill, EaseUS Data Recovery Wizard, and Recuva. Many offer free versions or trials that allow you to scan and preview files before purchasing, which is highly recommended.
Step-by-Step Guide to Using Data Recovery Software
Using data recovery software is a methodical process. Follow these steps carefully to maximize your chances of success:
- Download and Install the Software (Crucial Step): Download the data recovery software to a different drive than the one you're trying to recover files from. For example, if you deleted files from your C: drive, install the software on an external hard drive or a USB stick. Installing it on the same drive risks overwriting the very files you're trying to recover.
- Launch the Software and Select the Drive: Open the installed data recovery program. It will typically present you with a list of available drives. Select the drive (e.g., C:, D:, or an external hard drive) from which you want to recover the deleted files.
- Choose Scan Type: Most software offers different scan modes:
- Quick Scan: Faster, but less thorough. Good for recently deleted files or those still in the Recycle Bin (though direct recovery is better here).
- Deep Scan: Slower but much more comprehensive. This is what you'll need if the Recycle Bin has been emptied. It scans sector by sector for file signatures.
- Preview and Select Files: Once the scan is complete, the software will display a list of recoverable files. Many programs allow you to preview files (especially images and documents) to ensure they are intact and the correct ones. Carefully go through the list, selecting the files you wish to recover.
- Recover to a Different Location: This is another critical step. When prompted to choose a destination for the recovered files, select a different drive than the source drive. Recovering to the same drive could overwrite other recoverable files. For instance, if recovering from your C: drive, save the files to a USB drive, an external hard drive, or a network location.
- Verify Recovery: After the recovery process completes, navigate to the destination folder to confirm that your files have been successfully restored and are accessible.
Remember, patience is key during the scanning and recovery process. Do not interrupt the software or shut down your computer prematurely.
Beyond Software: Other Recovery Avenues
While data recovery software is powerful, it's not the only option. Depending on your setup and habits, other avenues might lead to successful file recovery.
Checking Backups and Cloud Services
This is often overlooked but can be the most reliable method if you've been proactive:
- Windows File History: If you've enabled File History in Windows, it automatically backs up versions of your files in Libraries, Desktop, Contacts, and Favorites. You can navigate to the folder where the file was originally located, right-click, select "Restore previous versions," and choose a version from before the deletion. This is an excellent form of cloud backup, even if it's local.
- System Restore Points: While System Restore primarily targets system files and settings, it can sometimes revert changes that affect user files, though it's less reliable for individual file recovery than File History.
- Cloud Storage Services: If you use services like OneDrive, Google Drive, or Dropbox, check their respective "trash" or "bin" folders online. These services often have their own version of a Recycle Bin, and many also maintain a version history of files, allowing you to revert to an older, undeleted version.
- External Backups: If you regularly back up your computer to an external hard drive or network-attached storage (NAS), your deleted files might still exist on those backup copies.
Always check these options before resorting to more complex data recovery methods.
Professional Data Recovery Services
In certain complex scenarios, especially when dealing with physically damaged drives (e.g., clicking sounds, drive not recognized, water damage), failed recovery attempts with software, or critical business data, consulting a professional data recovery service is your best bet. These services operate in specialized environments (like clean rooms) and use advanced proprietary tools and techniques to recover data from severely damaged storage media. They can perform component-level repairs and highly technical data extraction that is impossible for standard software. Be aware that professional services can be costly, but for irreplaceable data, they are often the only viable option. They specialize in cases involving hardware failure, corrupted file systems, and complex logical damage.
Preventing Future Data Loss: Best Practices
The best recovery strategy is prevention. Implementing robust data management and backup practices can save you immense stress and potential financial costs in the future.
- Regular Backups: This is the golden rule of data security. Implement a backup strategy that includes both local backups (e.g., external hard drive) and cloud backups (e.g., OneDrive, Google Drive, Dropbox, iCloud). Automate your backups whenever possible.
- Understand the Recycle Bin: Don't disable the Recycle Bin unless you have a very specific reason and a solid backup plan. It's there for a reason.
- Be Mindful of "Shift+Delete": Pressing Shift+Delete bypasses the Recycle Bin entirely and permanently deletes files. Only use this combination when you are absolutely certain you want to delete a file permanently and have no intention of recovering it. This action makes file restoration significantly harder.
- Organize Your Files: A well-organized file system reduces the chances of accidentally deleting important files. Use clear folder structures and meaningful file names.
- Use Reliable Antivirus Software: Malware and viruses can corrupt or delete files. A good antivirus program can protect your data integrity.
- Safe Ejection of External Drives: Always "safely remove hardware" before unplugging USB drives or external hard drives to prevent data corruption.
By adopting these practices, you minimize the risk of data loss and ensure that even if an accidental deletion occurs, you have multiple avenues for successful data recovery.
Frequently Asked Questions
What exactly happens when I delete a file to the Recycle Bin?
When you delete a file to the Recycle Bin, the file is not immediately erased from your hard drive. Instead, its entry is removed from the main file system index, and it's moved to a hidden directory on your drive that serves as the Recycle Bin. The operating system then marks the space occupied by that file as "available" for new data. The actual raw data of the file remains on the disk until new data is written over it. This allows for easy file restoration directly from the Recycle Bin.
Can I recover files after emptying the Recycle Bin without software?
Generally, no. Once the Recycle Bin is emptied, the file's reference is completely removed from the file system, making it invisible to the operating system. Without specialized data recovery software that can scan for residual file data or existing backups (like Windows File History, cloud services, or external drives), direct recovery is not possible. The software is needed to bypass the file system and locate the unindexed data.
How long do files stay in the Recycle Bin?
Files stay in the Recycle Bin indefinitely until one of two things happens: 1) You manually empty the Recycle Bin, or 2) The Recycle Bin exceeds its allocated storage size, at which point the oldest files are typically deleted to make room for newer ones. The default size for the Recycle Bin is usually a percentage of your drive's total capacity, but you can configure this setting in the Recycle Bin's properties.
Is data recovery software safe to use?
Reputable data recovery software is generally safe to use, provided you follow best practices. The most crucial safety tip is to install the software on a different drive than the one you're trying to recover files from. Installing it on the same drive can lead to data overwriting, making recovery impossible. Additionally, always download software from the official developer's website to avoid malware or corrupted installers. When recovering files, always save them to a different destination drive to prevent further data loss.
What is the "Shift+Delete" key combination, and why is it important?
The "Shift+Delete" key combination is a direct deletion command that bypasses the Recycle Bin entirely. When you use Shift+Delete, the selected files are immediately removed from the file system's index, and their space is marked as available for new data, just as if you had emptied the Recycle Bin. This means the files are not stored in the Recycle Bin and cannot be restored directly from it. Recovery of files deleted with Shift+Delete almost always requires data recovery software, and the success rate depends heavily on how quickly you act and how much new data has been written to the drive since the deletion.

0 Komentar